New Accessibility Checker Tool for Sakai’s Rich-Text Editor
By Layne Nordgren
![]() PLU’s Sakai learning management system now includes an Accessibility Checker tool you can use to inspect the accessibility level of content you create in the rich-text editor (CKEditor). This editor is embedded within many Sakai tools such as Lessons, Mailtool, Announcements, Assignments, etc. The Accessibility Checker tool interactively reports on each accessibility issue it finds in your content and often provides Quick-Fix options to correct issues.
PLU’s Sakai learning management system now includes an Accessibility Checker tool you can use to inspect the accessibility level of content you create in the rich-text editor (CKEditor). This editor is embedded within many Sakai tools such as Lessons, Mailtool, Announcements, Assignments, etc. The Accessibility Checker tool interactively reports on each accessibility issue it finds in your content and often provides Quick-Fix options to correct issues.
A Quick-Start for using the Accessibility Checker is available in the following Sakai help document:
Why Should I Use the Accessibility Checker?
Students are likely to access your online course content through a variety of devices including laptops, tablets, mobile phones, and assistive technologies such as screen readers. Some content that you post online might be inaccessible to students who have physical, cognitive, or learning disabilities, and some aspects of your content might introduce unnecessary barriers that impede students from successfully performing the learning activities you intend. As you create content in your Sakai courses, it is important that you design your materials with accessibility in mind.
The Accessibility Checker helps you to implement best practices for improving the accessibility of your course content, such as:
- header formatting for titles and other important text
- alternate text tags (alt text) for images
- numbered and ordered lists
- unique and descriptive hyperlinks
- alternate text tags (alt text) and descriptions for tables
Using the Accessibility Tool allows you to check for accessibility issues that, when resolved, can improve the learning experience for all users in areas such as:
- navigation of content
- legibility and readability
- understanding semantic structure of content
- access to links
How Does It Work?
Using the Accessibility Checker is a three-step process:
Step 1: Click Accessibility Checker Icon
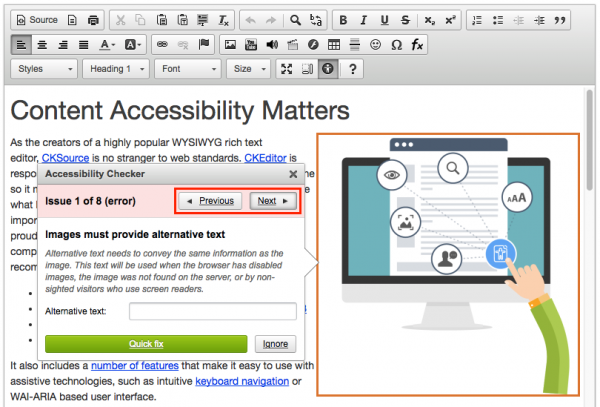
Access the Accessibility Checker tool by clicking its icon in the rich-text editor toolbar. The Accessibility Checker icon looks like a human silhouette inside a black circle.
Step 2: Review Suggested Changes
Review any reported issues in the Accessibility Checker dialog box that pops up. The pink area at the top of the box will provide a list of issues, along with Previous and Next buttons to navigate through the list.

Step 3: Implement Changes
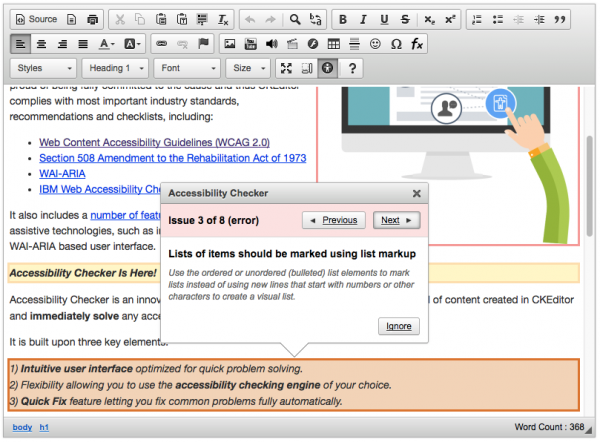
Some issues will have a Quick fix option (as show in the image above), allowing you to make corrections right in the dialog box. For other issues (like the one shown in the image below) the Accessibility Checker cannot provide a Quick fix because the suggestion requires editing your text. In this example, a list of items has been created by typing “1), 2), 3)” rather than using the Numbered List button. The Accessibility Checker will suggest you select the text and make it into a real numbered list, so that users of assistive technology can navigate it with greater ease.

Interactive Demo
Check out the interactive demo page for a quick introduction to the process of using the Accessibility Checker.
Learn More
Interested in learning more about the Accessibility Checker tool? Sign up for the hands-on workshop “Easy Steps for Making Your Course Content Accessible” at https://www.plu.edu/itech/workshops/ which will be held on March 16 at 12:00pm in Library 331. For a personal consultation, email itech@plu.edu.
Accessibility Checker Resources
- Interactive demonstration: https://cksource.com/accessibility-checker/demo.html
- Sakai Help document: How do I check my content for accessibility?
- CKEditor 4 detailed documentation: Managing Content Accessibility with Accessibility Checker


